my attempt to return to looking as gorgeous as I did when I was small and my mum made my clothes..
Monday 28 November 2011
Hooray!
No pictures yet, but I can inform you that the Glee dress is finished! Only a year in the making, and 8 blog mentions later..
Friday 25 November 2011
The Joan Process Dress, and how to draft darts on a dressform
One of the main reasons I was inspired to start sewing was my inability to get the clothes I wanted that fit me. the sort of dresses I had in mind were very fitted and brightly coloured and vintage in character. Lets face it, like pretty much every one else on the planet, I wanted to be Joan Holloway. She just wears such a stunning selection of fabulous form fitting clothes in gorgeous jewel tones.


 Now I hate FBAs. They always seems to end up more trouble than they are worth, you faff and faff and it fits just as badly when you are done (this may just be me!). Luckily it can be all much more straightforward if you cut out the middle process and just fit on your body or a dress form. To do this, I extended parts of the pattern for the front before I cut it out. I added a little bit on at the waist (as I don't wear a corset) and then 1.5 inches at sides level with the bust (the amount the width was too small plus a bit) and added an additional3 inches to the length (in addition to the 3 inches for the overall length change as I did on the back). (If you zoom in on the image here you will be able to see what I did (the orange notes were reminders for me of how much I added)


Pin the middle of the bodice so that it doesn't slip around.


Of course, being me, despite sewing, I have still not made anything remotely like this. Until now! When out with Hannah I picked up some lovely bright blue jersey (called Process Blue in the Pantone system apparently) to have a stab at a Joan dress.

The pattern I am using is one that I found in a bulk ebay order a while ago-in my size! Woman W400, a slim fitted dress for knits. I was particularly drawn to it as the lady has it in such a bright green.
After my slightly disastrous prewashing, I cut out the pieces. I have bought a lot so that I can recut the front bodice if it all goes wrong. I cut out the skirt, back and sleeves as the pattern, but added 3 inches of length to the back bodice, as getting the waist in the right place is always worth checking.

I then sewed the shoulder seams to the back and put it on my dress form. Shapely no?


To be clear at this point, I have put the bodice on the correct way round, as I am making a pattern piece off this. If I am just going to sew it up, if I am doing a refashion for example, or its all going to be very fiddly, I put it on inside out, and then once you have pinned everything you can just sew it up.
I pinned the side seams at the bottom and top, leaving the bit that might be a side dart loose. I then assessed the back and arm hole bits to see if the rest fits. The back on mine is a little bunchy, and the arm hole is folding oddly, so will need to be included in the dart to take the excess out.

I then just pinched out the extra material to make the side dart. I am just trying to remove the excess from the extra length of the material at the side where it doesn't have to go over any boob. I am being careful here because it is a stretch material. As you can see I have pulled out some of the excess in the arm pit area and hence adjusted the bit at the top of the side seam I pinned at the start. (if you make big adjustments to this area remember so you can make corresponding changes to the sleeve). Pin along the seam, but use a pin to note where you want the point of the dart to end.


Do the same on the other side, it doesn't have to be exactly the same, but it should look the same on the body. If you are doing a muslin you can just do half and then repeat on the pattern. If you are not, you need to match the bust points and the direction of the dart so it doesn't look wonky.

The area below the bust is still all baggy as you no longer need at the width of material at this point.

Pin the middle of the bodice so that it doesn't slip around.
Then just pinch out the dart as you need.

Once you have done both sides, you need to mark on where the waistband should be. Some people mark the waist on the dress form but I find it more useful to have the markings on the outside of the clothes I am making. I have a big piece of elastic that I just use like a belt so I can see how it will sit on the body.

Once you have all this, mark on your lines with chalk, or baste along the seams if easier.

Then take it off and unpin it, and lay your fabric over the paper pattern piece. Poke through with a pin along all the seams and then when you remove the fabric, you will have pin marks in the paper you can join together to mark your darts on the pattern.
Now I just have to sew up the darts and then move on to the rest of the dress!
Thursday 24 November 2011
I may have created a monster!
Well I taught Hannah how to make a skirt-and it went really well! I think she may be a natural, by the end she was sewing with far more control of the pedal speed than I manage! (I just tend to bash it down and go full speed-frequently in the wrong direction!)
I made a substantial (accidental!) effort to show her that mistakes happen and can be easily fixed-there were several mistakes-all of them mine! I caught some material in under the bit I was sewing round the zip, and had to seam rip it, and we cut out the pieces of the waistband the wrong way up on the fabric (should have turned the pattern pieces over) but luckily on this pattern that doesn't matter at all. My major error however, was just me being a complete idiot (seems to be a theme with this skirt!) as I carefully bought some nice fusible interfacing, but when I tried to iron it on it wasn't sticky..doh! I had got the non fusible kind. It was fine as it gave Hannah a chance to practice sewing on none visible seams so all was well. Only it wasn't-as when we came to iron the first proper seam, I realised that I had not plugged the iron in properly. So it was fusible... and I had just sewed it into a piece I had to iron, with the fusible side up. sigh. It was fine however, and once the whole thing was assembled it will have all stuck itself together nicely!
Barring my errors however it went extremely well. My first proper project was a bit of a trial, and somewhat demoralising. I was keen that this wouldn't be for Hannah. She was extremely excited and seems to have the bug well and truly! We had a nice rummage through all my patterns and fabric getting overexcited! By far the triumph of the skirt was the pattern matching. I didn't even try to match the pattern as we cut it, I am not very good at that sort of thing anyway and it would have made the cutting out stage last forever and been unduly scary. But without any effort at all the front waistband matches almost exactly, and the sides and back make pretty chevrons! We had made the decision to just cut the front on the fold rather than as two pieces so we didn't have to match that, but I was slightly gobsmacked at how well it turnd out!

 |
| can you see the waistband seam-I can't! |
Monday 21 November 2011
hmmm - need to think before i wash..
This weekend me and my future sister in law went fabric shopping. Hannah wants to make her own clothes so I am going to teach her! (I am quite excited!). We decided that her first project should be a Ginger skirt, as it is fairly simple but looks good when done. We will be using a normal zipper rather than invisible, not because I think she can't handle it, but because I don't seem to be able to get my invisible zipper foot to work recently. I think in any case a normal zipper will be more helpful in explaining itself (I always find invisible ones a bit counter-intuitive somehow..).
So we went to find fabrics, checking out the Aladdin's cave that is Edinburgh Fabrics, and going gushy over the bright designer patterns in John Lewis (followed by snooping round the new Anthropologie shop!). I think it is very safe to say that we will not be good influences in terms of restraining each other's fabric buying! Hannah got some lovely purple and yellow spotty cotton, and I splurged on some pink Martha Negley flowery cotton and bright blue double knit. I then carefully told Hannah to wash her fabric before we sewed with it, like the wise sewing sage that I am. Or not as it turns out, as I then popped my own fabrics in to wash together and never thought that bright blue fabric might not be entirely colour fast yet... So now I have slightly purple flowers on a pale blue background...I will give it another wash later and hopefully some of it will come back out, though I don't really mind-it is still very pretty! But not clever.
So we went to find fabrics, checking out the Aladdin's cave that is Edinburgh Fabrics, and going gushy over the bright designer patterns in John Lewis (followed by snooping round the new Anthropologie shop!). I think it is very safe to say that we will not be good influences in terms of restraining each other's fabric buying! Hannah got some lovely purple and yellow spotty cotton, and I splurged on some pink Martha Negley flowery cotton and bright blue double knit. I then carefully told Hannah to wash her fabric before we sewed with it, like the wise sewing sage that I am. Or not as it turns out, as I then popped my own fabrics in to wash together and never thought that bright blue fabric might not be entirely colour fast yet... So now I have slightly purple flowers on a pale blue background...I will give it another wash later and hopefully some of it will come back out, though I don't really mind-it is still very pretty! But not clever.
 |
| before the bluing.. |
Saturday 12 November 2011
The Private Benjamin top
 I found this top in a charity shop, and liked the colours, but the shape was terrible. One for the reasons I don't have a lot of rtw non stretchy tops, is the general approach to make them massive and completely shapeless.
It is a stylised camouflage print with a nicer set of colours. But it makes me look like a sack of potatoes.
I look extremely glum in this before picture.. As you can see top is super unflattering.
So I put some long darts in at the front and back, and took in the side seams, added a (really badly sewn in!) zip and made it fit me. Much better!


Friday 11 November 2011
hmmm.. macaron
A while ago, I picked up a copy of Macaron by Colette Patterns on a whim (oh me and my pattern addiction).


It then sat unused on my desk for several months. It is a lovely pattern, but it is a very cute pattern, and I don't really do cute, partially as when you put cute on my fairly tall curvy figure it can just look a bit "we gave all the bridesmaids the same dress and we picked it to suit the 10 year old". There a lot of gorgeous Macarons out there, but none of them really grabbed me.. until this week's Sew Weekly challenge-Pin ups, when Macaron veteran Adey moved away from her previous jolly colourful ones, and made a grown up sexy version. Excellent.
Now I can't really pull off animal prints, but the less cute version has inspired me to consider some different colour options. The Macaron is a dress that screams out for colour blocking, but how to to that without it looking too girly or (as mentioned by snugbug) too much like those strapless dresses with white tshirts sewn in that we all wore in the 90s..
A bit of rooting around on the old image search and pinterest threw some interesting options.
Luxe it up a bit with some glamorous yet still officy gold satin and navy
 |
| dorothy perkins us |
Some lovely bright blue, keeping the black for the yoke
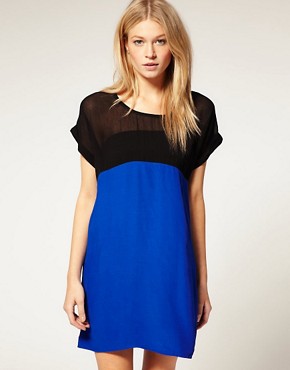 |
| asos |
Cut a new panel out form the front and mix up the colours even more
 |
| shabby apple |
Team a nice conservative grey with something wilder
 |
| asos |
I was torn, between smart useful stuff I might actually wear, and zany bright colours... and then I spotted this..
 |
| eva longoria in victoria beckham |
oohh..
it is decided. at some point, I am going to make a Macaron with a bright red body and a dark red yoke. I may have to get on with some other projects first though!
Subscribe to:
Posts (Atom)